Thursday 30 August 2012

send php mail using gmail smtp server

Everyone looking for cheap/free and reliable smtp server to send mails using php. Gmail is the one of the best and reliable way to send the mails from php.

To send php mail from localhost requires lot much settings and to purchase costly domains/host. While gmail is free and reliable way to send mail from localhost using php.

Below I have given all the gmail smtp servers and its port to send mail. Also, given some headers to send images in mails. means to send images inside the php mail content.

Remember : First of all you need to uncomment the extension=php_openssl.dll into the php.ini file. If you don't find this line into php.ini file then copy it from here and paste it into php.ini and restart your apache server. This is proper solution for following Warning:

Warning : Failed to connect to smtp.gmail.com:465 [SMTP: Failed to connect socket: Connection refused (code: -1, response: )]
100% Working and tested. Feel free to use below code

<?php

//IT is PEAR mail function file. Don' t remove below line 
require_once "Mail.php";

$from = "your_gmail_ID";
$to = email_of_recipient;

$subject = "Subject Of Your Mail";
$body = '<img src="youBanner.jpg/png/gif" />  <br/>';
$body.='Your Body content';

// SMTP and PORT setting for Gmail
$host = "ssl://smtp.gmail.com";
$port = "465";
$username = "yourGmailEmail@gmail.com";
$password = "yourGmailPassword";

//Setting up Headers for text and Image content type
$headers = array ('From' => $from,
                            'To' => $to,
                            'Subject' => $subject);

//Mail Header for Support HTML tags Images and UTF charset
$headers["Content-Type"] = 'text/html; charset=UTF-8';

$smtp = Mail::factory('smtp',
                                   array ('host' => $host,
                                             'port' => $port,
                                             'auth' => true,
                                             'username' => $username,
                                             'password' => $password));

//Send Email using pear sned option
$mail = $smtp->send($to, $headers, $body);

//If any errors occurs
if (PEAR::isError($mail)) {
            echo("<p>" . $mail->getMessage() . "</p>");
}
else {
             echo("<p>Message successfully sent!</p>");
}

?>


If you found any message regarding deprecated and strict standard error then dont worry about it just put error_reporting(E_ALL); or error_reporting(0); and you are done.


Generally We found code for gmail mail sending using php but there is no HTML tag support found easily.
For that you need to customize its header like above to support images and other tags in body of gmail.

With this HTML header, we can easily add tags like div, span, table, and all the other HTML supporting.

If you want simple Header to support \n and \r ten just remove the above header.

If you are done with successful sending then I recommend you to remove the error code. Which generally used to check SMTP error in mail factory.

Monday 20 August 2012

Create-Export csv file from mysql using php

Often you or your client has requirement to generate/create/export table records of database in excel sheet. 
Now it is possible to generate excel sheet of mysql database table using php. 

We will see that how easy to generate reports using php and mysql of table.

Code: 
<?php
    //Connection to database
    mysql_connect("localhost","root","");
    mysql_select_db("yourDatabase");

    $result = mysql_query("SELECT * FROM `table`");
    if (!$result) die('Couldn\'t fetch records');
    $num_fields = mysql_num_fields($result);

    $headers = array();

  // Creating headers for output files
    for ($i = 0; $i < $num_fields; $i++)
    {
        $headers[] = mysql_field_name($result , $i);
    }

    $fp = fopen('php://output', 'w');
    if ($fp && $result)
    {
    // name of file with date
        $filename = "jobPostingReport-".date('Y-m-d').".csv";
         
            // Setting header types for csv file.
            header('Content-Type: text/csv');
            header('Content-Disposition: attachment; filename='.$filename);
            header('Pragma: no-cache');
            header('Expires: 0');
            fputcsv($fp, $headers);

            while ($row = mysql_fetch_row($result))
            {
                 fputcsv($fp, array_values($row));
            }
            die;
     }
?>

Explanation Of Code:

First two lines to create connection to the database. Then create your desired query with field which are required to generate csv files.
if(!$result) to check whether your query is correct or not, if not then it will execute next lines means here "die".
Next set the headers/titles for CSV files from query resource. mysql_field_name() has two arguments first one is resource and the second one is offset, offset starts with 0.
 Now open the file writing wrapper with writable mode using fopen('php://output', 'w'). php://output is a write-only stream that allows you to write to the output buffer mechanism in the same way as print and echo.
for more info about wrappers - http://www.php.net/manual/en/wrappers.php

Now, use the above headers to export/download csv files from MySQL database and php.

fputcsv() command will help you to place data into csv sheet. At first write the headers/titles of csv files means field name to the csv file with help of file pointer which we have created earlier.

Now, Finally using fetch_array() fetch all rows and write them all into csv file using file pointer.

Saturday 18 August 2012

database engine and database table types in mysql-mysqli

Engines or Engine types are storage handlers for database tables. MySQL / MySQLi supports different engines like MyIASM, InnoDB, HEAP (Memory), CSV, ARCHIVE, BLACKHOLE, MERGE (MRG_MyISAM) etc.

Engine selection is depends upon what kind of requirement you have. Generally, people do avoid it as they don't have much knowledge about it. But engine is performing very important role in your transaction and table data safety. Most people uses MyIASM and InnoDB. InnoDB is having higher advantage and very safe engine compare to MyIASM. We will see its comparison below.

MyIASM
MyIASM is default engine in MySQL/MySQLi. It used very oftenly and oldest engine database. It is suitable for simple and small application where there is no importance of security and relational database. MyIASM is unable to setup relational key(Foreign keys). 
It provides high-speed storage and retrieval, as well as fulltext searching capabilities. MyISAM is supported in all MySQL configurations, and is the default storage engine unless you have configured MySQL to use a different one by default. It has very average rating for table design. 
MyIASM is extension of IASM which is not available at all. 
Each MyIASM table stored on disk with three files. The files name are same as table name and have three different file types. An .frm file stores the table format. The data file has an .MYD (MYData) extension. The index file has an .MYI (MYIndex) extension.
InnoDB
InnoDB is one of the good and safe engine for transaction. It is transaction safe engine and follows ACID property(Atomicity, Consistency, Isolation, Durability). It has commit, rollback, and crash-recovery capabilities to protect user data.  
InnoDB row-level locking and Oracle-style consistent nonlocking reads increase multi-user concurrency and performance. InnoDBstores user data in clustered indexes to reduce I/O for common queries based on primary keys.  
To maintain data integrity, InnoDB also supports FOREIGN KEY referential-integrity constraints. You can freely mix InnoDB tables with tables from other MySQL storage engines, even within the same statement. Simply we can say that  nnoDB is very reliable due to transactional nature of data operations, and makes it very good choice for systems where backup operation are essential and often needed. InnoDB tables are reliable and has many safety measures implemented to make sure that data remains safe. 
InnoDB is used in production at numerous large database sites requiring high performance. The famous Internet news site Slashdot.org runs on InnoDB. Mytrix, Inc. stores more than 1TB of data in InnoDB, and another site handles an average load of 800 inserts/updates per second in InnoDB.  
It has only one file type .frm, which means reduce in other extra files compare to MyIASM. Possibly prefer InnoDB over MyIASM. 
MEMORY (HEAP)
The MEMORY storage engine creates tables with contents that are stored in memory. Formerly, these were known as HEAP tables. MEMORY is the preferred term. 
As indicated by the engine name, MEMORY tables are stored in memory. They use hash indexes by default, which makes them very fast, and makes it very useful for creating temporary tables.  
As its being volatile, when the server shut down all the data are lost only table definition remains(becomes empty table), means needs to store the data before shutting down the server.  
As table definition remains in database, it creates one file of type .frm extension.
MERGE (MRG_MyISAM)
The MERGE storage engine is also known as MRG_MyISAM. It is collection of identical MyIASM tables, which cab be used as one. 
“Identical” means that all tables have identical column and index information. You cannot merge MyISAM tables in which the columns are listed in a different order, do not have exactly the same columns, or have the indexes in different order. 
When you create a MERGE table, MySQL creates two files on disk. The files have names that begin with the table name and have an extension to indicate the file type. An .frm file stores the table format, and an .MRG file contains the names of the underlying MyISAM tables that should be used as one. The tables do not have to be in the same database as the MERGE table. 
To create a MERGE table, you must specify a UNION=(list-of-tables) option that indicates which MyISAMtables to use.
CSV
The CSV storage engine stores data in text files using comma-separated values format. It can be used on windows only in newer version which is higher than MySQL 5.1. 
When you create a CSV table, the server creates a table format file in the database directory. The file begins with the table name and has an .frm extension. The storage engine also creates a data file. Its name is same as table name and has a .CSV extension. The data file is plain text file. When you store data into the table, the storage engine saves it into the data file in comma-separated values format (CSV).
ARCHIEVE
The ARCHIVE storage engine is used for storing large amounts of data without indexes in a very small footprint. 
Archive storage engine does compresses your data and should be good for log storage or storing something which needs no updates and no indexes, however compression ratio is not perfect, configuration and stats could be improved.  
The ARCHIVE engine supports INSERT and SELECT, but not DELETE, REPLACE, or UPDATE. It does support ORDER BY operations, BLOB columns, and basically all but spatial data types. The ARCHIVE engine uses row-level locking.  
When you create an ARCHIVE table, the server creates a table format file in the database directory. The file begins with the table name and has an .frm extension. The storage engine creates other files, all having names beginning with the table name. The data and metadata files have extensions of .ARZ and .ARM, respectively. An.ARN file may appear during optimization operations.
BLACKHOLE
The BLACKHOLE storage engine act as a "black hole", it accepts data and throws it away and does not store anything. Retrieves only empty result. 
When you create a BLACKHOLE table, only the .frm file is created, because it does not reuire to store data so no .MYD and .MYI file needed.  
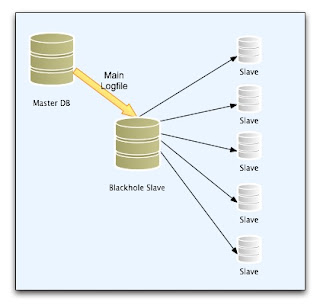
If you run in a high volume production system where you may have one or more master databases for writes/updates/deletes and a whole bunch of slaves reading the log from that master which in short increase the network traffic, disk I/O, CPU power and others, this affect the performance of a Master Server.
What you then have is the Master only replicating to one database, increasing the Master’s capacity to process transactions. The slaves consume the log file from the Blackhole server. It acts as a proxy at this point, with the benefit of freeing up resources on the Master’s server. 
The master writes to its binary log. The “Blackhole” server acts as a proxy slave server, it does not actually store any data, so there is little processing overhead incurred and other SLAVE server will read a binary log from this server. 
Other possible uses for the BLACKHOLE storage engine include:
- Verification of dump file syntax.
- Measurement of the overhead from binary logging, by comparing performance using  BLACKHOLE with and without binary logging enabled.

php list all directories and its files and subdirectory

Often you may need to list all the directories and subdirectory/files in tree structure in your side panel as the content or examples. This kind of things are mainly required in Educational or Learning blogs.

By looking those required here I have created one side panel which will help you to create yours one and also i have given full code explanation for creating / listing all the directories and its files. See code and its output as listed  below.

It it also very helpful to display all the image files of some directory without typing code for all Images. If you use following code then you can simply place the images in to your folder and you have done. Means all the image files will be loaded itself with php code. 

It will give you freedom to change your files/images at anytime without worrying about linking it to pages.


FILE NAME : index.php

<html>
<head>
           <title>Untitled Document</title>
           <link href="styles.css" rel="stylesheet" />

            <script type="text/javascript">
                        /* To show code into iframe set source of that file in iframe*/
                        function loadContent(x)
                        {
                                    document.getElementById('frmContent').src = x;
                         }
            </script>
</head>

<body>
<div id="body">
    <div id="header">
        <h1>Mukund </h1>
        <hr style="border:#A63600 3px solid"/>
    </div>

    <div id="container">
      <div id="sidebarLeft">
        <ul>
<?php
// set handle for directory resource
// '../' replace it with your desire directory.
        if ($handle = opendir('../')) {
// black list files which you dont wanna include. 
// you can add more files in following manner.
            $blacklist = array('.', '..', 'youDirectory');
        
          while (false !== ($file = readdir($handle)))
         {
                if (!in_array($file, $blacklist)) {
                    echo '<li>'.$file.'</li>';

                    // Set Directory path with latest directory here i have given path from root directory
                  $directory = "../".$file."/";

    // list each file of Directory - $file
    echo '<ul>';
         // for HTML files
$htmlFiles = glob($directory . "*.html" );
foreach($htmlFiles as $htmlFile)
{
echo '<li>
                                  <a href="#" onclick="loadContent(\''.$htmlFile.'\')">'.basename($htmlFile).'</a>
                                 </li>';
}

// Simillarly For PHP Files
$phpFiles = glob($directory . "*.php" );
foreach($phpFiles as $phpFile)
{
echo '<li>
                                  <a href="#" onclick="loadContent(\''.$phpFile.'\')">'.basename($phpFile).'</a>
                                 </li>';
}
           echo '</ul>';
/ / End of file listing.
             }
           }
          // close the directory handle.
            closedir($handle);
       }
       ?>
        </ul>           
    </div>
    <div id="content">
        <p>Hi, Click on respective pages to view content of it.</p>
        <iframe src="" id="frmContent"></iframe>
    </div>
    </div>
</div>
</body>
</html>


STYLESHEET : styles.css

body{
width:994px;
margin:0 auto;
font-family:Verdana, Geneva, sans-serif;
font-size:14px;
}
#body{
background:#DAEBFC;
}
#header{
padding:15px;
height:60px
}
#container{
padding:15px;
overflow:auto
}
#sidebarLeft{
float:left;
width:160px;
border:1px solid #CCC;
padding:5px;
font-size:12px
}
#sidebarLeft ul{
padding:0;
margin:0
}
#sidebarLeft ul li{
padding:5px;
list-style:none;
font-weight:bold;
font-size:16px
}
#sidebarLeft ul ul{
margin-left:15px
}
#sidebarLeft ul ul li{
font-weight:normal;
font-size:12px;
padding:2px
}
#content{
float:left;
padding:0 0 15px 15px;
width:775px
}
#content iframe{
width:770px;
height:720px;
margin:o auto;
overflow:scroll;
border:1px solid #ccc
}


Out put in IE9


Explanation of Code

Functions: 
opendir(): The opendir() function opens a directory handle to be used by the closedir(),    readdir(), and rewinddir() functions.This function returns a directory stream on success and FALSE and an error on failure. You can hide the error output by adding an '@' in front of the function name. 
readdir(): The readdir() function returns an entry from a directory handle opened by opendir().
This function returns a filename on success and FALSE on failure. The entries are returned in the order in which they are stored by the filesystem.
glob(): The glob() function returns an array of filenames or directories matching a specified pattern.This function returns an array of files/directories, or FALSE on failure.
Code Explanation

In above PHP code First you are creating a handle for your directory which is given as directory('../'). For current directory replace '../' to './'. Now create blacklist array which you don't want to display.

While loop will executed for times until it will false the readdir handle. In While loop return value of readdir() is checked. Here we are checking return value is identical and of same type too. If any directory entry whose name evaluates to FALSE will stop the loop.

Next, If loop will check for blacklist files directory if any files/directory that falls into blacklist it will be skipped. in_array($file, $blacklist) function is used to check that $file is in the $blacklist array or not.

Now, simply use the glob function to list all the matching files. glob($directory.'*.jpg') which will list all the files whose extension is .jpg. In above example I have used listed .php and .html files. For your specific files you can replace extension as per your requirement.

Last close the handle and terminate the code.

Sunday 12 August 2012

Stored Procedure in php with example

Stored Procedure : These are set of SQL Commands / Statements that are stored in database in compiled form so that can be shared by a number of programs.

stored procedure is a subroutine stored in the database catalog.

Advantages of Stored Procedure
  • Developed once, All applications can use same Command / Statements.
  • Task becomes easier and less complicated.
  • Network traffic reduced to greater extent as not sent repeatedly to server / reduces CPU load.
  • Centralization of Command / Statements, which helps in repeated call
  • Runs on any environment.


Basic Structure

CALL Procedure(....) - The CALL SQL statement is used to execute a stored procedure.

Parameters - IN/INOUT/OUT

ParameterDescription
IN An IN parameter passes a value into a procedure with CALL. The procedure might modify the value, but the modification is not visible to the caller when the procedure returns.
INOUT An INOUT parameter is initialized by the caller, can be modified by the procedure, and any change made by the procedure is visible to the caller when the procedure returns.
OUT An OUT parameter passes a value from the procedure back to the caller. Its initial value is NULL within the procedure, and its value is visible to the caller when the procedure returns.
Specifying a parameter as IN, OUT, or INOUT is valid only for a PROCEDURE. For a FUNCTION, parameters are always regarded as IN parameters.

Understand Procedure in PHP By Example

First we need to create database:
CREATE DATABASE `userdata`
Then create Table:
CREATE TABLE IF NOT EXISTS `users` (
`id` int(10) unsigned NOT NULL AUTO_INCREMENT,
`name` varchar(100) NOT NULL,
`contact` varchar(10) NOT NULL,
PRIMARY KEY (`id`)
) ENGINE=InnoDB DEFAULT CHARSET=latin1 AUTO_INCREMENT=5  
 Dumping Data into table:
INSERT INTO `users` (`id`, `name`, `contact`) VALUES
(1, 'Mukund Topiwala', '9422222222'),
(2, 'Ram ', '6666666635'),
(3, 'Veer', '5689782532'),
(4, 'BCW', '6584225141');
Afte Creating database and tables now look at the procedure.

Remember: 
"If you are using phpMyAdmin for MySQL or MySQLi You may have to create and compile Your Procedure into sql command box."
DELIMITER //
DROP PROCEDURE IF EXISTS `userdata`.`getUsers` //
CREATE PROCEDURE `userdata`.`getUsers`
(
IN uId INT,
OUT fullName VARCHAR(100),
OUT contactNo VARCHAR(10)
)
BEGIN
SELECT name, contact
INTO fullName, contactNo
FROM users
WHERE id = uId;
END //
DELIMITER ;
Explanations:
Here Client DELIMITER command used to change default delimiter ; to // while procedure is being defined. After setting DELIMITER DROP is used to drop the old procedure similar to drop table. First you check for the stored procedure if exist drop it before you recreate it. 
CREATE is used to create new stored procedure. Here in above example getUsers has three parameters uId, fullName, and contactNo. uId is passed to the Procedure that is why set to IN while fullName and contactNo is being returned from the procedure to caller, set to OUT. For more details see parameters table
Body of Procedure is written inside the BEGIN and END block. SELECT query that is used to select name and contact from the users table where the id = uId which is passed from the caller in CALL statement. OUT variable retrieves the value from the SELECT statement. fullName is set into  name and simillarly contactNo is set into contact.
Remember:

"Your Procedure is stored inside `ROUTINES` Table of `information_schema`

Once You compiled and successfully created your Procedure you can view it by following query

select routine_definition
from information_schema.routines
where routine_schema = 'userdata'
and routine_name = 'getUsers';   "
As you have created and compiled your procedure in MySQL now time to create a PHP file.

With MySQL AND PHP
<?php
       $mysql = mysql_connect('localhost', 'root', '');
       mysql_select_db('userdata', $mysql) ; 
       print '<h3>MySQL: simple select</h3>';
       $rs = mysql_query( 'SELECT * FROM users;' );
       while($row = mysql_fetch_assoc($rs))
      {
      echo $row["name"]."||".$row["contact"]."<br>";
      } 
      print '<h3>MySQL: calling Procedure with out variables</h3>';
      $rs = mysql_query( 'CALL getUsers(1, @name, @contact)' );
      $rs = mysql_query( 'SELECT @name, @contact' );
      while($row = mysql_fetch_assoc($rs))
      {
      echo $row["@name"]."||".$row["@contact"];
      }
?>
With MySQLi AND PHP
$mysqli = new mysqli('localhost', 'root', '', 'userdata');
print '<h3>MYSQLI: simple select</h3>';
$rs = $mysqli->query( 'SELECT * FROM users;' );
while($row = $rs->fetch_object())
{
print_r($row);
print("<br>");
}
print '<h3>MYSQLI: calling Procedures with out variables</h3>';
$rs = $mysqli->query( 'CALL getUsers(1, @name, @contact)' );
$rs = $mysqli->query( 'SELECT @name, @contact' ); 
while($row = $rs->fetch_object())
{
print_r($row);
print("<br>");
Output :

To retrieve all field as array you can use print_r($row) function too.
replace echo line with print_r


MySQLi output :


Now to retrieve all the recordset with no repeated same value. (visit - retrieve recordset using stored procedure)

DELIMITER //
DROP PROCEDURE IF EXISTS `test`.`get_users`$$
CREATE PROCEDURE  `test`.`get_users`()
BEGIN
SELECT *
FROM users;
END //
DELIMITER ; 
print '<h3>MySQL: calling Procedure returning a recordset – Won't work here with MySQL</h3>';
$rs = mysql_query( 'CALL get_users()' );
while($row = mysql_fetch_assoc($rs))
{
print_r($row);
print("<br>");
Output: Warning: mysql_fetch_assoc(): supplied argument is not a valid MySQL result resource in ***.php on line xx 
print '<h3>MySQLi: calling Procedure returning a recordset</h3>';
$rs = $mysqli->query( 'CALL get_users()' );
while($row = mysql_fetch_assoc($rs))
{
print_r($row);
print("<br>");
Output: as above in simple mysqli select

As you can see from the results above, mysql could not get the recordset returned by the stored procedure while mysqli and PDO could. After some more research, some people mentioned (Bob’s World, php.net) that by adding ‘false,65536′ to the end of the mysql_connect line, mysql could then get recordsets from stored procedures. I tried this and in fact it does work. So by changing
$mysql = mysql_connect(‘localhost’, ‘example’, ‘example’);
to:
$mysql = mysql_connect(‘localhost’, ‘example’, ‘example’,false,65536);

Wednesday 8 August 2012

Make Footer Stick to Bottom of Page

It is often required to keep footer stick  to the bottom of page.

Here I have given Sticky footer which always sticks to the bottom of page when your page content is not tall enough to stretch the body/container of page.

If your webpage contains enough content then it may not create problem but when content is not enough it will not appear at bottom where exactly it has to be. It just appear next to where your page gets over. This looks not good in page design.

Here with following code I have given solution for making footer stick to bottom.


Stylesheet Code 

*{margin:0;padding:0} /* To remove extra spacing */
html,body{
min-height:100%;
height:100% /* For Older browser height */
}
#body{
min-height:100%;
width:960px;
margin:0 auto;
font-weight:bold;
}
#content{
padding-bottom:100px;/* This vary with your footer size */
}
#footer{
width:960px;
margin-top:-100px;/* Footer height as per above padding(Negative Val) */ 
margin-left:auto;
margin-right:auto
}


Now Look at the HTML Code


<div id="body">
    <div id="content">
   <h1>Mukund Topiwala</h1>
    </div>
</div>
<div id="footer">
    Here is your Footer
</div>


Here is the sticky footer page view. How its look in your browser

Stick footer to bottom of page

tested in IE9, Mozilla firefox, Chrome 16